AyumuScript is a basic scripting language used to create small programs and automate specific tasks in osakaOS.
Once again, I'll go over the technical details of how AyumuScript works, and then I'll go over basic scripting examples and practice.
This is likely going to be the largest and most detailed page in the manual, so get ready to be hit with giant walls of text.
At its most basic, AyumuScript can be described as segments of text being read from a file, and interpreted as commands.
This is more or less, what the interpreter does exactly. This is done so there is some compatibility with the command line.
The interpreter is very simple and easy to understand, but this comes with a few drawbacks. The main one being the lacking expressivity.
AyumuScript isn't capable of parsing and understanding mathematical expressions, complex boolean statements, or multiple data types.
The expressiveness of the language is limited to assembly-like math operations, data definition, and 2 operand - 1 operator boolean statements.
This is a basic overview of the language, to get a better understanding of its capabilities, I will list the syntax and funcationality of the commands used for scripting.
int (string) (integer) ex. int n 10 output: The value 10 will be saved in variable 'n'.
This command is how you define variables in osakaOS. Currently they are only limited to integers within the range of 32 unsigned bits.
Typing 'n' after this command will print out the value stored in 'n', which would be 10. Variables are used to store such data and perform basic arithmetic.
You can also define variables using previously defined variables, meaning the new variable will be defined with the value inside of the old one.
For example, int x n, will define a new variable 'x', with the value inside of 'n'. In this case, 'x' would equal 10. int x will define a variable with the value 0.
Another important aspect of scripting is expressing certain commands through variables. Any command that takes an integer argument can also take a variable in its place.
For example, wmem 0 n will write the value of 'n' to memory address 0. wmem x n will write the value of 'n' to memory address 'x'.
You can have a maximum of 1024 variables at a time. Currently there is no way to destroy variables, so they will exist until the system memory reboots.
Variables are accessed the same way commands are through a hash table. Variables cannot have the first character of their name be a number or a '$'.
The following commands are used to perform basic arithmetic and logic with variables.
+ (variable) (int1) (int2) ... (int-n) ex. + n 20 output: The value 'n' will be increased by 20.
This command adds all of its arguments together and saves it in the variable that was passed as the first argument.
As mentioned before, the integer arguments can also be variables themselves. If 'n' = 10 and 'x' = 5, + n x will save 15 in 'n'.
You can add multiple integers/variables until the command exceeds the max length of 256 characters, as long as each argument is seperated by a space.
These same rules apply to every command dealing with variable arithmetic.
Here are the other basic arithmetic commands.
- (variable) (int1) (int2) ... (int-n) ex. - n 10 output: The value 'n' will be decreased by 10.
* (variable) (int1) (int2) ... (int-n) ex. * n 3 output: The value 'n' will be multiplied by 3.
/ (variable) (int1) (int2) ... (int-n) ex. / n 4 output: The value 'n' will be divided by 4.
% (variable) (int1) (int2) ... (int-n) ex. % n 15 output: The value 'n' will be the remainder of 'n' divided by 15.
Here are the commands for bitwise operations.
& (variable) (int1) (int2) ... (int-n) ex. & n 16 output: The value 'n' will be AND'ed by 16.
| (variable) (int1) (int2) ... (int-n) ex. | n 256 output: The value 'n' will be OR'ed by 256.
^ (variable) (int1) (int2) ... (int-n) ex. ^ n 48 output: The value 'n' will be XOR'ed by 48.
For an example, I will define a variable, use it to perform basic math, and pass it along to different commands to see how the output changes.
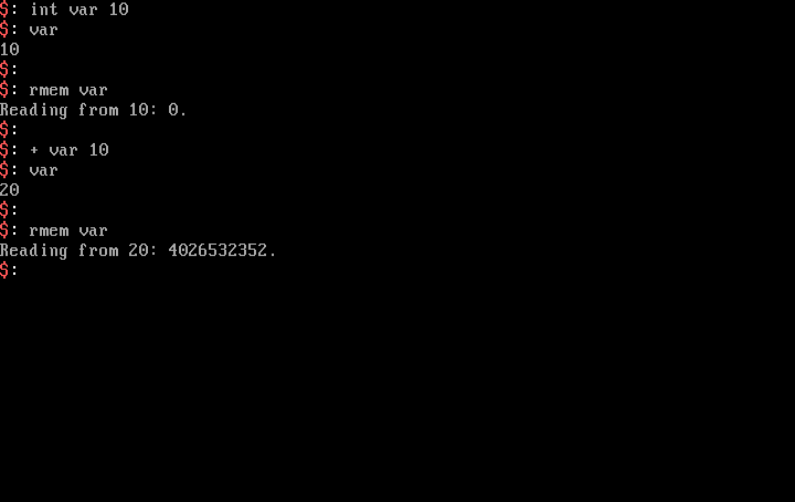
First, a variable 'var' is defined with the value of 10. Typing the variable's name will show this value.
Then 'var' is passed as the argument to read a memory address in the command rmem var. The output is Reading from 10: 0.
Then 10 is added to 'var' in the command + var 10. Typing the variable's name again will show the new value of 20.
Then the exact same command as before is done, this time reading from memory address 20 and the output being Reading from 20: 4026532352.
Now that basic arithmetic has been covered, I will go over how if-statements work in AyumuScript.
If-statements will evaluate whether or not a statement is true, if it is, nothing happens and the script continues as usual.
If it isn't true, the command line will stop processing commands until told otherwise. This same logic also applies to loops.
Because of this, if-statements cannot be nested and only work within this singletasking enviornment.
Along with the basic math operations, if-statements are also possible to do in the command line alone.
if (int1) (operator) (int2) ex. if x >= 5 output: If 'x' is less than 5 then commands will stop being processed.
fi output: Commands will be processed again if a previous if-statement is false.
For an example, I will use the variable 'var' to test whether or not it is equal to, greater than, or less than certain values.
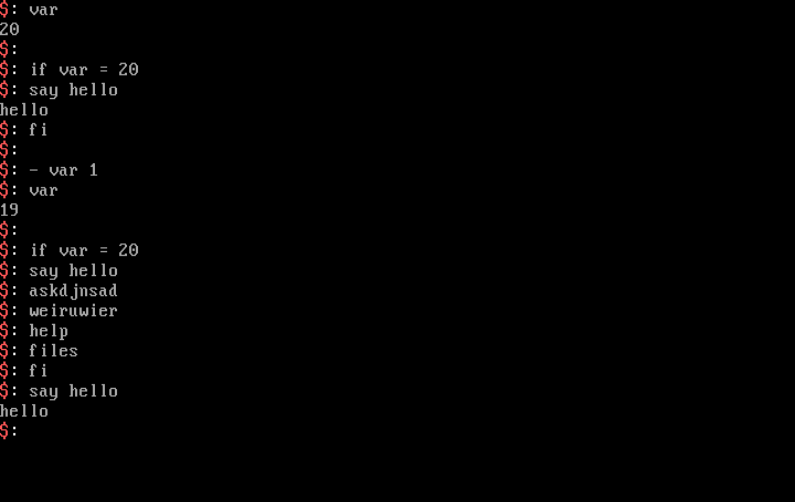
Since 'var' has a value of 20, the statement if var = 20 is true and allows the following commands to be processed.
Then I subtracted 1 so that 'var' has a value of 19. Now when the same if-statement is passed, commands stop being processed, and don't show any output.
Then once fi is passed, commands start producing output again, meaning the state has been reset.
Here are a few more examples of if statements.
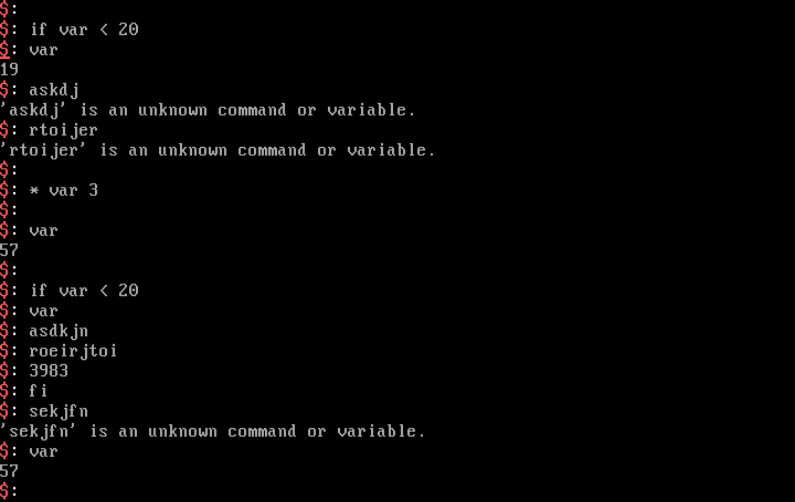
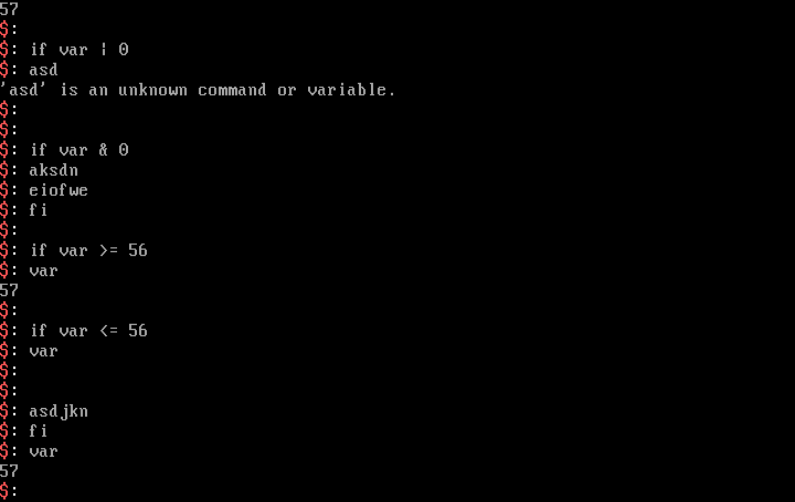
As mentioned earlier, loops follow much of the same logic as if-statements. Loops are 1 of 2 things in AyumuScript that can't be done purely in the command line.
Loops determine whether or not the given statement is true, and if it is, the position in the file where the loop command is located is saved and the rest of the commands are executed.
Once the loop reaches the end of its scope, the file position of the interpreter is changed to the position that was previously saved, and the statement is evaluated again, repeating the loop.
Because of this it is possible for the statement to remain true infinitly and repeat forever, and in a singletasking envrionment, this means a system hang.
There is no circumvention for this in version 1.0, but I will reference this and other bugs in the last page.
The commands for loops are very similar to if-statements and can be used like the following.
loop (int1) (operator) (int2) ex. loop x = 5 output: Will enter a loop as long as 'x' is equal to 5.
pool output: Signals to the interpreter that this is the end of the loop scope.
If loops are done in the command line they act exactly like if-statements, so for this example, I will write an actual script and save it in a file.
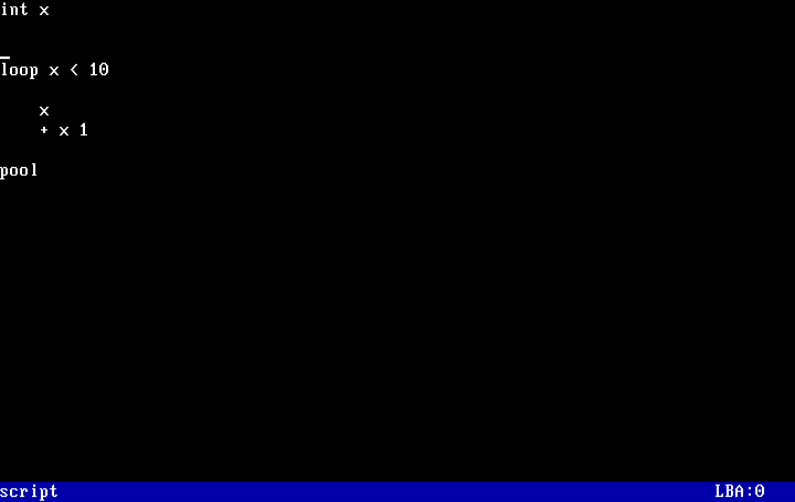
First a variable 'x' is defined and is not given a value, meaning its initialized to 0 by default.
Then the command loop x < 10 is sent and evaluated. Since the statement is true, the script continues to execute the following commands.
The loop contains 2 commands, x and + x 1, meaning all the loop does is print out the value in 'x', and increment 'x' by 1.
This last command is especially important since without it, the system would run in an infinite loop and the user would have to reboot.
Lastly, the command pool signals the end of this loop's scope and tells the interpreter to evaluate the initial statement again since it is still true.
Another important thing to note is that the interpreter doesn't recognize the end of a statement until it reaches a 0x00 byte. White space is important in this regard.
Now that the logic of this script is finished all thats left is to execute it. This can be done with the following command.
ex (file) ex. ex my_script output: Will feed the given file to the AyumuScript interpreter for execution.
This command will execute the given OFS file as a script, regardless of its structure.
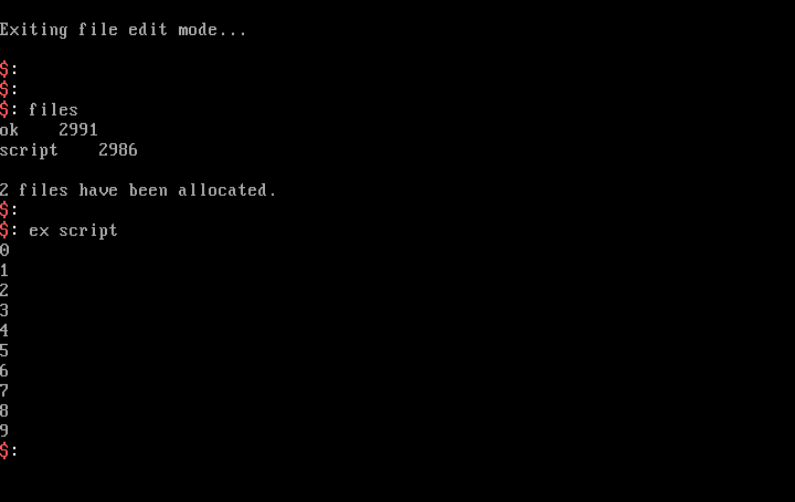
Since the name of the AyumuScript file is script, ex script will feed it to the interpreter for execution.
The output ends up printing the number 0 to 9. You can probably figure out why I'm not tryna explain that shit lol.
If-statements can also be used within loops, and you can see examples of this in my AyumuScript video (here).
AyumuScript can also save the output of commands into variables. This is done through the $R statement.
$R is hardcoded into the command line as a variable that updates itself with the integer output of various commands.
For example, if rmem 255 returns the output Reading from 255: 60245, $R will now be equal to 60245.
You can also pass this value to different commands. If you define a variable with the last example, int n $R, then 'n' would equal 60245.
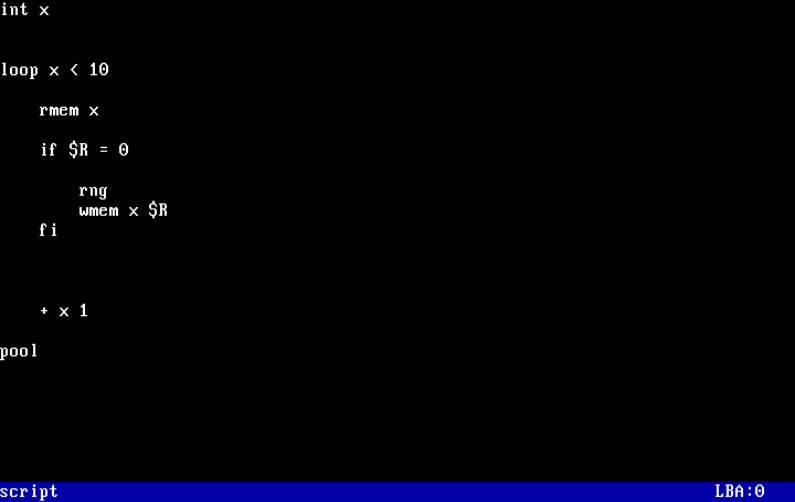
For an example, I will write a script that reads the first 10 memory addresses and writes 1 to any addresses with a value of 0.
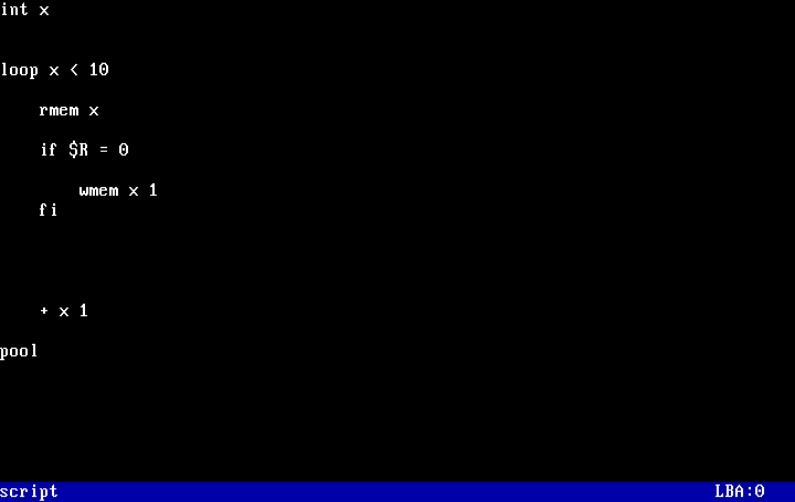
Every time rmem x is executed, $R is updated with the return value. This return value is passed to an if-statement to see if its equal to 0.
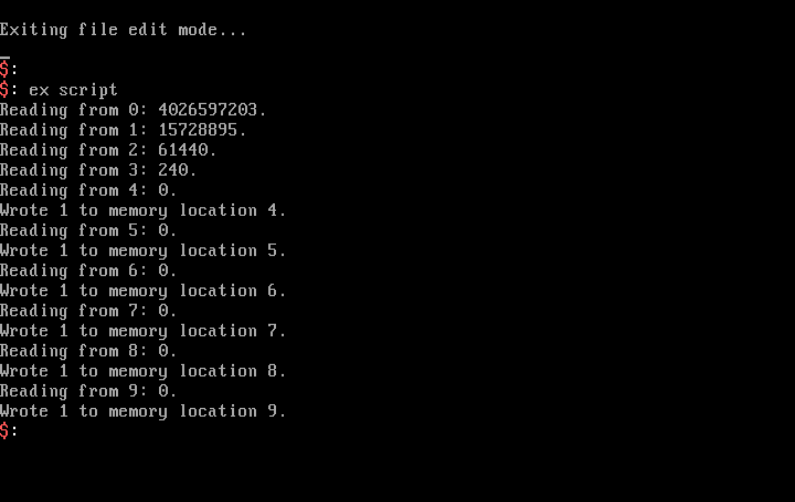
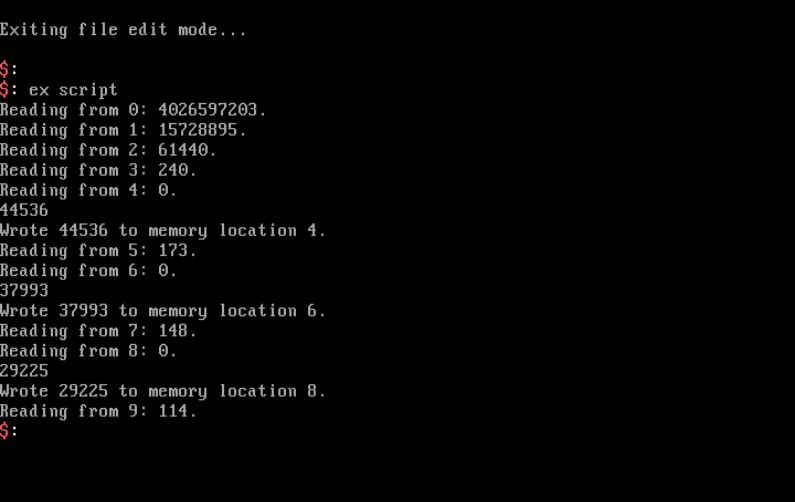
The output of this script can be seen in the picture below.
Another feature is the ability to produce random numbers. This is done through the following command.
rng output: Produces a random number from the PIT and saves it to $R.
The previous script can be edited to write psuedo-random numbers instead of 1.
Extra Infomation
It is possible to execute other scripts within scripts. Although you have to keep in mind that they all share the same 'loop' and 'if' flags that can interfere with eachother.
Nested loops and if-statements aren't working in version 1.0. If-statements that are true don't need to be followed by fi to work, but its still obviously best practice.
Indents within loops also aren't necessary but they make the code easier to read and understand. Loops should be contained all within one LBA in the file editor.
Comments are also supported through the following command.
// (anything) output: Does nothing.
This command does nothing and is just a way to write comments in AyumuScript.
The next page will cover VGA mode and the graphical user interface.
